
Chole often looks simple, but many home cooks face the same problem: the chickpeas stay flat in taste, the gravy feels thin, or the spices taste raw even after cooking. A good chole recipe is not only about adding more masala. It is about soaking correctly, cooking the chickpeas until creamy, building the base slowly, and using a few small tricks that improve flavor without making the process difficult.
This 2026 chole recipe keeps the method practical for everyday cooking. It uses regular kitchen ingredients, simple timing, and smart steps that make the gravy deeper, darker, and more balanced. The recipe is useful for lunch, dinner, weekend meals, tiffin-style serving, or a small family gathering. You do not need restaurant equipment or hard-to-find spices. With the right order of cooking, even basic ingredients can give strong flavor.
Recipe Information
Recipe Name: 2026 Chole Recipe
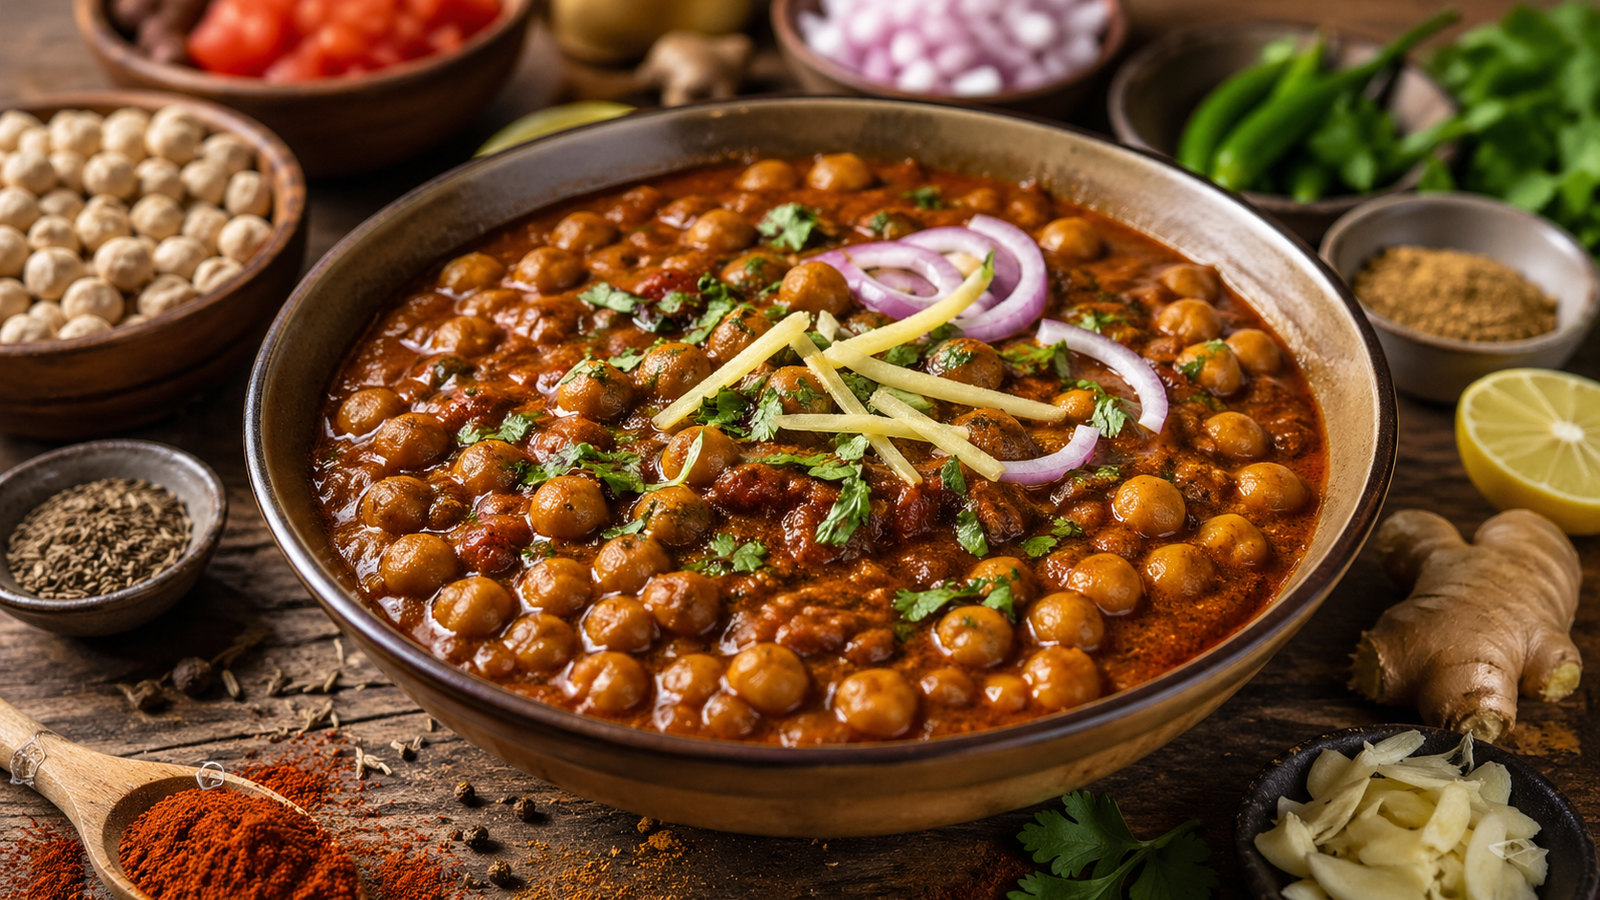
Description: Soft chickpeas simmered in a rich onion-tomato masala with tea-infused cooking water, roasted spices, ginger, garlic, and a final tempering for deep flavor.
Servings: 4 servings
Preparation Time: 20 minutes
Cooking Time: 45 minutes
Total Time: 1 hour 5 minutes
Difficulty Level: Medium
Recipe Category: Main course, vegetarian curry
Cuisine Type: North Indian
Resting Time / Inactive Time: 8 hours for soaking chickpeas
Ingredients
- 1 cup dried chickpeas, soaked overnight
- 4 cups water, for pressure cooking
- 1 black tea bag or 1 teaspoon tea leaves tied in cloth, optional for darker color
- 1 bay leaf
- 1 black cardamom, optional
- 1 small cinnamon stick
- 1 teaspoon salt, or as needed
- 2 tablespoons oil or ghee
- 2 medium onions, finely chopped
- 2 medium tomatoes, finely chopped or pureed
- 1 tablespoon ginger-garlic paste
- 1 green chilli, slit
- 1 teaspoon cumin seeds
- 1 teaspoon coriander powder
- 1 teaspoon cumin powder
- 1/2 teaspoon turmeric powder
- 1 teaspoon red chilli powder
- 1 teaspoon chole masala
- 1/2 teaspoon garam masala
- 1/2 teaspoon amchur powder or 1 teaspoon lemon juice
- 1/2 teaspoon crushed kasuri methi
- 1 tablespoon fresh coriander, chopped
- 1 small piece ginger, cut into thin strips
- 1 tablespoon butter, optional for finishing
Preparation
Start by washing the dried chickpeas well. Soak them in enough water for 8 hours or overnight. The chickpeas should have enough space to expand. If the kitchen is warm, keep the bowl in a cool place so the water does not smell sour by morning.
Drain the soaked chickpeas and rinse them once again. Add them to a pressure cooker with fresh water, salt, bay leaf, black cardamom, cinnamon, and the tea bag. The tea gives a deeper color, but it should not be boiled too long after cooking, or it may leave a bitter taste. Remove the tea bag once the chickpeas are cooked.
Pressure cook for 5 to 6 whistles on medium heat, or until the chickpeas are soft enough to press between two fingers. If using an electric pressure cooker, cook for about 28 to 32 minutes on high pressure and allow natural release. The chickpeas should not be hard in the center.
While the chickpeas cook, prepare the masala. Heat oil or ghee in a deep pan. Add cumin seeds and let them crackle. Add chopped onions and cook them on medium heat until golden brown. This step matters because pale onions make the gravy taste weak. Do not rush this by using high heat, as the onions may burn outside while staying raw inside.
Add ginger-garlic paste and green chilli. Cook for 1 to 2 minutes until the raw smell goes away. Add the tomatoes and cook until the oil starts to separate from the masala. This is one of the most important parts of the recipe. If the tomatoes are not cooked properly, the final chole may taste sharp and unfinished.
Add coriander powder, cumin powder, turmeric powder, red chilli powder, and chole masala. Mix well and cook the spices for about 1 minute. If the masala looks dry, add 2 tablespoons of chickpea cooking water instead of plain water. This small step keeps the flavor connected because the starchy cooking water already carries chickpea taste.
Now add the cooked chickpeas with some of their cooking liquid. Keep the remaining liquid aside and add more only as needed. Mash 2 to 3 tablespoons of chickpeas with the back of a spoon and mix them into the gravy. This is a simple trick for thicker chole without cream, flour, or extra onion.
Simmer the chole on low heat for 15 to 20 minutes. The gravy should slowly thicken and coat the chickpeas. Stir occasionally so the bottom does not stick. If it becomes too thick, add a little more cooking water. If it is too thin, simmer uncovered for a few more minutes.
Add garam masala, crushed kasuri methi, ginger strips, and amchur powder. Mix well and cook for 2 minutes. Taste and adjust salt. Add lemon juice only at the end if you are not using amchur. Adding sourness too early can sometimes make the chickpeas feel firmer.
For a stronger finish, heat 1 teaspoon oil or ghee in a small pan. Add a pinch of red chilli powder and pour it over the chole. This final tempering gives color and aroma without making the whole dish too oily. Finish with fresh coriander and a small spoon of butter if desired.
Cooking, Baking, or Use Tips
The first little-known trick is to salt the chickpeas while pressure cooking. Many people add salt only at the end, but adding it during cooking helps the chickpeas taste seasoned from inside. Do not add too much; a basic amount is enough, and final adjustment can be done later.
The second trick is to keep the chickpea cooking water. This liquid is valuable because it has starch and flavor. Using it in the gravy gives better body than plain water. It also helps the masala cling to the chickpeas naturally.
The third trick is to mash a small portion of the cooked chickpeas. This gives a thick, creamy texture without adding cream or heavy ingredients. It is especially useful when the tomatoes are watery or when the gravy looks thin.
The fourth trick is to cook onions and tomatoes fully before adding the chickpeas. Raw masala cannot be fixed by simply boiling longer. The base must become glossy and slightly thick before chickpeas are added.
The fifth trick is to add sour ingredients near the end. Amchur, lemon juice, or anardana improves taste, but if added too early, the chickpeas may not soften as well. Keep the tangy flavor for the finishing stage.
The sixth trick is to rest the chole for at least 15 minutes after cooking. Chole tastes better when the gravy settles and the spices absorb into the chickpeas. If serving for guests, cook it a little early and reheat gently before serving.
The seventh trick is to avoid too much water in the final simmer. Chole should not taste like chickpeas floating in curry. Add liquid slowly and let the gravy reduce until it coats the chickpeas well.
For texture, the chickpeas should be soft but not broken completely. If they are undercooked, the gravy may taste good but the dish will still feel incomplete. If they are overcooked, mash only a small amount and handle gently while stirring.
For storage, cool the chole fully before keeping it in the fridge. Store in an airtight container for up to 3 days. Reheat on low heat with a splash of water. Avoid reheating again and again in the same large container. Take out only the portion needed.
If serving with bhatura, keep the gravy slightly thick. If serving with rice, keep it medium-thick so it mixes well. For roti or paratha, a thicker gravy works better and feels less messy on the plate.
Variations or Conservation
For a darker Punjabi-style chole, use a tea bag while cooking and add a little roasted cumin powder at the end. Do not overuse tea, because it should only give color, not a strong tea taste.
For a lighter home-style version, reduce the oil to 1 tablespoon and skip butter. Use finely chopped tomatoes instead of puree for a fresher texture. The flavor will be simpler but still satisfying.
For extra tang, add 1 teaspoon anardana powder instead of amchur. It gives a deeper sour taste. If using lemon juice, add it after turning off the heat so the flavor stays fresh.
For a no-onion version, use tomato puree, ginger, green chilli, and extra roasted cumin powder. The gravy will be thinner, so mash a few more chickpeas to improve body.
For leftover chole, use it in practical ways. Stuff thick chole into paratha dough filling, make chole toast, serve it over jeera rice, or turn it into a quick chaat with onion, coriander, lemon, and sev. If the gravy is too thick the next day, loosen it with hot water and simmer for 3 to 4 minutes.
To reduce waste, do not throw away extra chickpea water. Use it to adjust the gravy, knead dough, or add to vegetable curry for body. Leftover ginger stems or coriander stems can be chopped finely and cooked with the masala instead of being discarded.
You can also cook a double batch of chickpeas and freeze half without masala. This saves time for future meals. Freeze the cooked chickpeas with a little cooking liquid so they do not dry out. When needed, thaw and add them to fresh masala.
Conclusion
This 2026 chole recipe is practical because it focuses on small steps that make a clear difference: proper soaking, seasoned boiling, fully cooked masala, saved cooking water, mashed chickpeas for thickness, late souring, and resting before serving. These tricks do not make the recipe complicated, but they improve flavor and texture in a reliable way.
Once you understand the method, chole becomes easy to repeat. It works with rice, roti, paratha, poori, or bhatura, and leftovers can be reused without waste. Keep the process simple, cook the base patiently, and let the chickpeas absorb the gravy. That is what makes homemade chole taste complete.
